Namespaces allow dividing a Kubernetes cluster on logical segments with an isolated set of resources. This mechanism enables creation of multi-tenant environments within one cluster, enabling multiple teams to use one infrastructure. At the same time it raises the problem of granular access to cluster resources.
In this article I will demonstrate how to grant user access to a specific namespace by using an authorization token and define their permissions with the Role-Based Access Control (RBAC) policies.
Granting user access with token
To create a user within a Kubernetes namespace and grant them access to specific resources, you begin by creating a ServiceAccount in your desired namespace. This ServiceAccount acts as the “user” for your applications or services running in Kubernetes. Next, define a ClusterRole that specifies the permissions you want to grant, such as access to pods, services, and other resources. Although cluster roles are cluster-wide, you can scope the permissions to a specific namespace by creating a RoleBinding within that namespace, linking the ClusterRole to your ServiceAccount. This setup ensures that the ServiceAccount has the necessary permissions only in the designated namespace, effectively creating a namespace-scoped user with access to particular resources.
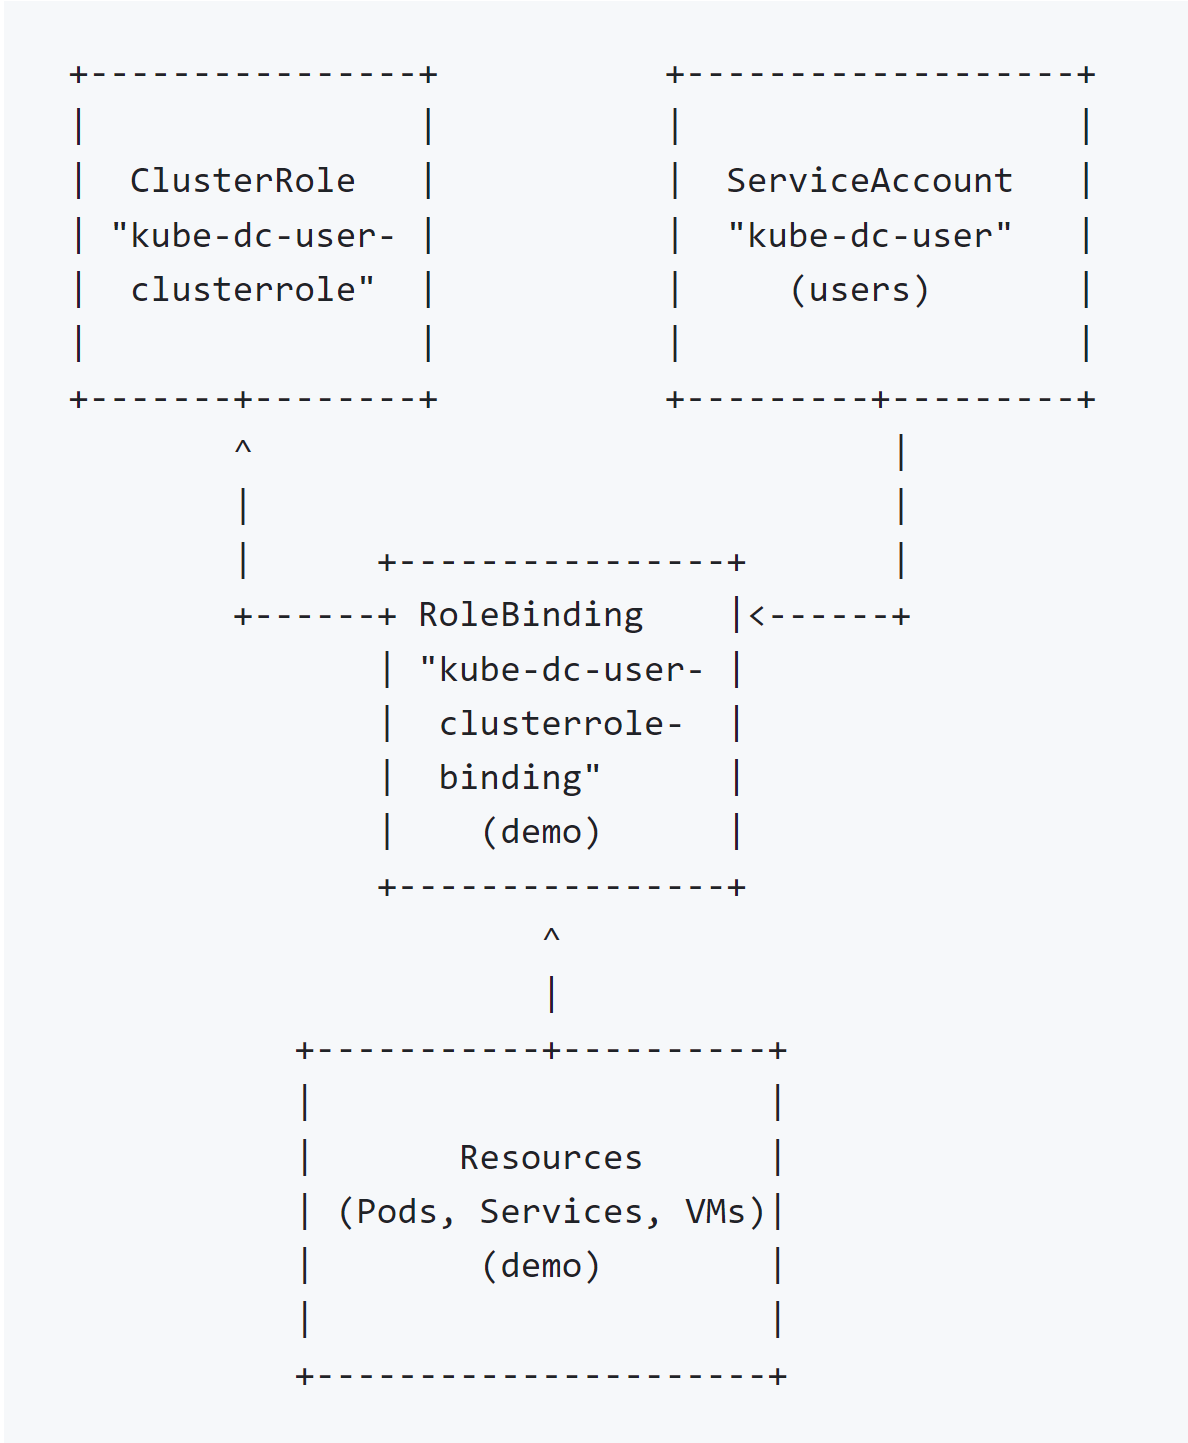
Step 1: Define a ClusterRole
Define a ClusterRole with the permissions you want to grant. This cluster role does not specify namespaces because it’s designed to be applicable cluster-wide.
apiVersion: rbac.authorization.k8s.io/v1
kind: ClusterRole
metadata:
  name: kube-dc-user-clusterrole
rules:
- apiGroups: [""]
  resources: ["pods", "services"]
  verbs: ["get", "list", "watch"]
- apiGroups: ["apps"]
  resources: ["deployments", "replicasets", "statefulsets"]
  verbs: ["get", "list", "watch"]
- apiGroups: ["cdi.kubevirt.io"]
  resources: ["datavolumes"]
  verbs: ["get", "list", "watch"]
- apiGroups: ["kubevirt.io"]
  resources: ["virtualmachineinstances", "virtualmachines"]
  verbs: ["get", "list", "watch"]
Step 2: Create a ServiceAccount
Users should be kept in permanent namespace users, and access would be granted for particular namespace by setting RoleBinding in particular namespace:
apiVersion: v1
kind: Namespace
metadata:
  name: users

apiVersion: v1
kind: ServiceAccount
metadata:
  name: kube-dc-user
  namespace: users
Also a secret token should be created:
apiVersion: v1
kind: Secret
metadata:
  name: kube-dc-user-token
  namespace: users
  annotations:
    kubernetes.io/service-account.name: "kube-dc-user"
type: kubernetes.io/service-account-token
Step 3: Create RoleBindings in Specific Namespaces
apiVersion: rbac.authorization.k8s.io/v1
kind: RoleBinding
metadata:
  name: kube-dc-user-clusterrole-binding
  namespace: demo
subjects:
- kind: ServiceAccount
  name: kube-dc-user
  namespace: users
roleRef:
  kind: ClusterRole
  name: kube-dc-user-clusterrole
  apiGroup: rbac.authorization.k8s.io
Step 4: Retrieve the ServiceAccount Token
Created token name is with the suffix -token added to existing user:
# Get the token for the user
kubectl get secret kube-dc-user-token -n users -o=jsonpath='{.data.token}' | base64 --decode
Using curl to Query the API
Here’s an example using curl to query virtual machines in a specific namespace:
SA_TOKEN=$(kubectl get secret kube-dc-user-token -n users -o=jsonpath='{.data.token}' | base64 --decode)
curl -k -H "Authorization: Bearer $SA_TOKEN" \
https://demo.kube-dc.com:6443/apis/kubevirt.io/v1/namespaces/demo/virtualmachines
Create a kubeconfig from token
If you’re using kubectl on your local machine, you can temporarily set the KUBECONFIG environment variable or modify your kubeconfig file to use the Service Account token. This approach is useful for manual inspections or when scripting interactions with Kubernetes.
First, create a new kubeconfig file or modify an existing one to include the Service Account token. Here’s a basic example of how to set up a context that uses the Service Account token.
Get the API server address:
APISERVER=$(kubectl config view --minify -o jsonpath='{.clusters[0].cluster.server}')
Get the CA certificate (if needed):
kubectl get secret <service-account-secret-name> -n <namespace> -o jsonpath='{.data.ca\.crt}' | base64 --decode > ca.crt
Replace <service-account-secret-name> and <namespace> with the actual secret name and namespace.
Create a kubeconfig file.
Here’s an example of adding a new user, context, and cluster in your kubeconfig. You might want to add this to an existing kubeconfig file or create a new one specifically for this purpose.
apiVersion: v1
kind: Config
clusters:
- name: my-cluster
  cluster:
    certificate-authority: /path/to/ca.crt  # Adjust the path as needed
    server: https://<api-server-address>    # Use the APISERVER variable
users:
- name: kube-dc-user
  user:
    token: <your-service-account-token>
contexts:
- name: kube-dc-user@my-cluster
  context:
    cluster: my-cluster
    namespace: <namespace>  # Specify the namespace if desired
    user: kube-dc-user
current-context: kube-dc-user@my-cluster
Replace <api-server-address>, <your-service-account-token>, and <namespace> with your actual API server address, the token you retrieved, and the namespace you want to use.
Conclusion
The RBAC policies and authorization via tokens are critical features of Kubernetes cluster security that allow you to control who can do what in each namespace. Following the steps described in this article will help you define user permissions within a certain namespace granting granular user access to cluster resources.