Upgrading a Kubernetes cluster for the first time can be a tricky process. Kubernetes usually hosts the core components of your stack and there’s a possibility that things could go wrong. As someone who works with Kubernetes, I have firsthand experience of this. To avoid any mishaps, I have compiled my knowledge into a cheat-sheet, which I am glad to share with you. I hope that you will find these notes useful.
These guidelines assume that your workloads are stateless, as they should be in Kubernetes. As always, plan operations related to data storage especially carefully (Persistent Volumes) – it is always recommended to have a backup. Storing data on local volumes is highly undesirable as it goes against best practices.
Before upgrading
- Before you begin, it is advisable to have scheduled automated backups in place, performed by Velero. If automated backups are not available, make manual backups of any non-recoverable manifests, if applicable.
- For self-managed clusters perform an etcd (state database) backup.
- Do NOT upgrade the production cluster during business hours.
- Perform a test upgrade on a non-production cluster and document every action and problem encountered, along with the steps taken to resolve them. These notes will serve as the foundation for your production deployment plan.
Remember
- The Kubernetes control plane does not provide native support for rollback, particularly in managed clusters where you have limited control over the underlying etcd.
- Kubernetes is a resilient platform. If you make a mistake during the upgrade process, you can always fix it because you have all the actual manifests and configurations of your workloads.
- Having a deployment plan can reduce downtime to a minimum and save your mental health!
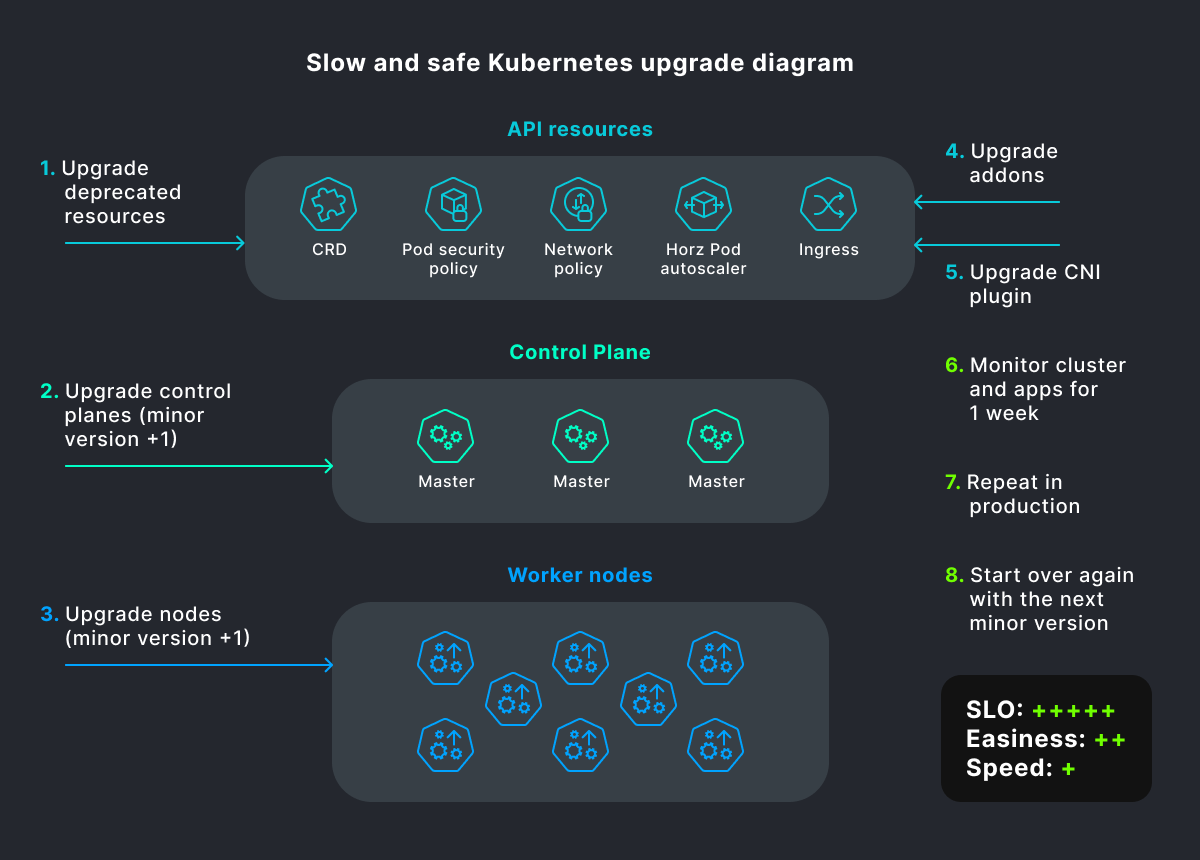
Slow and safe Kubernetes upgrade

A measured and hassle-free upgrade, performed in a way that is generally recommended.
- Upgrade your Kubernetes cluster consistently, one minor version at a time. For example, if you are currently on version 1.x, upgrade to version 1.x+1.0. This approach ensures a smoother transition and allows you to address any potential issues in a more manageable way. Upgrading directly to the latest version can introduce more complexities and may require additional time and effort to troubleshoot and fix any problems that occur.
- Before upgrading, make sure that all components of your Kubernetes cluster are running the same version. This includes both the control plane and worker nodes. Having mismatched versions can lead to compatibility issues and potential errors during the upgrade. For instance, if your control plane is running version 1.24 while one or more of your worker nodes are running version 1.23, it is necessary to update the nodes to match the control plane version before proceeding with the upgrade.
- For a large cluster that hosts a diverse range of applications, make a one-week pause between cluster upgrades. This will allow for sufficient time to identify and address any unforeseen issues or mistakes that may arise following the upgrade. Although the initial upgrade is performed on a non-production cluster, it is important to remember that developers are also clients in this context. Incorporating this pause allows for internal testing and validation, giving developers an opportunity to provide feedback and report any issues they may encounter.
1. Read this official source of truth regarding the version you upgrade to.
2. Find removed API resources in a version you upgrade to by checking the official deprecated api doc.
3. It is always important to identify whether your cluster has deprecated resources which are removed in the version. For example, extensions/v1beta1 moved to networking.k8s.io/v1 or apiextensions.k8s.io/v1beta1 moved to apiextensions.k8s.io/v1.
-
- If a deprecated resource belongs to a public chart, simply upgrade the chart.
- If a deprecated resource belongs to your company’s in-house application, adjust your yaml manifest to the new scheme. The `kubectl explain …` command will help you with that.
4. Upgrade control plane(s) – one minor version at a time, one control plane at a time. This is extremely easy with managed clusters, like EKS.
5. Upgrade nodes – one version at a time.
-
- If your critical production applications are not distributed among multiple nodes, it can result in downtime for your clients due to a node failure or maintenance. To address this, it is recommended to define a Pod Distribution Budget (PDB) and set up pod anti-affinity rules. Remember, while Kubernetes provides built-in fault tolerance mechanisms, it is essential to manage your workloads wisely by leveraging these features.
- In AWS it comes down to changing the launch template AMI to the newer kubelet version and refreshing an Auto Scaling group.
- In modern Kubernetes environments, it is generally considered a best practice to avoid manually upgrading the kubelet version on individual nodes. Instead, a recommended approach is to treat nodes as disposable entities and automate the process of launching new nodes with the desired kubelet version.
6. Upgrade cluster addons, if EKS. For more details see the official documentation: https://docs.aws.amazon.com/eks/latest/userguide/managing-add-ons.html
Example command to upgrade cluster addons to Kubernetes version 1.26:
1 | <strong>aws eks describe-addon-versions --kubernetes-version 1.26 --query 'addons[].{MarketplaceProductUrl: marketplaceInformation.productUrl, Name: addonName, Owner: owner Publisher: publisher, Type: type}' --output table</strong> |
7. Upgrade a CNI plugin for a self-managed cluster (skip this step if the cluster is managed).
-
- Different CNI plugins may have specific requirements and compatibility limitations with certain Kubernetes versions. Before upgrading, it is crucial to check the compatibility of your installed CNI plugin with the version you are planning to upgrade to. Fixing a non-functional CNI can be a challenging task, as it directly impacts the networking capabilities of your cluster and can lead to service disruptions.
8. Monitor the upgrade. Closely monitor the upgrade process to identify and resolve any issues that arise. Keep an eye on logs, metrics, and alerts to ensure the cluster and applications are running smoothly post-upgrade.
After upgrading
– Check if all pods are running.
– Test your frontend functionality.
– Check for errors in your central monitoring system.
– Repeat the latest successful deployment to the cluster.
– Check whether the internet is reachable and DNS resolves external names.
– Check whether one pod can reach another pod running on another node.
9. Repeat in production.
10. Go to step 1 with the next minor version.
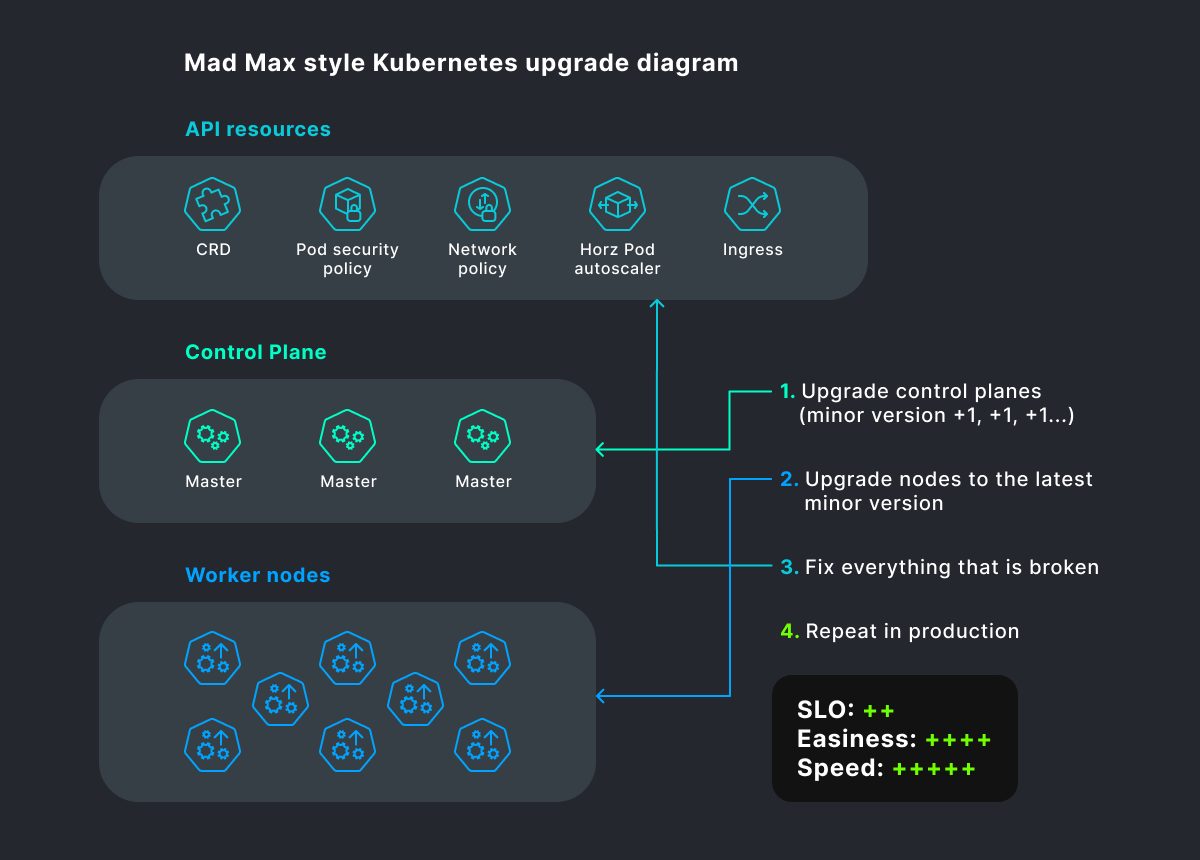
Mad Max style Kubernetes upgrade

A Mad Max style upgrade is a daring and adventurous approach to Kubernetes cluster upgrades. It involves a rapid cluster upgrade considering the fact that issues will arise along the way. While it can be an exciting challenge, it requires a confident and well-coordinated team to handle any potential issues that may occur.
Another important consideration is the availability of downtime. Cluster upgrades can be complex, especially when changes are coupled with various repositories, CI/CD configurations, and code changes. The process may involve fixing issues, submitting pull requests (PRs), and iterating on fixes multiple times, which require time and coordination. I would not recommend this option unless you have at least one week of downtime to play with a staging/dev cluster.
- Upgrade Kubelets to the latest version skipping minor versions.
- Upgrade control planes one version at a time.
- Fix broken things afterwards with ChatGPT.
- Write notes to a deployment plan.
- Repeat in production on Friday (Mad Max works on weekends sometimes).
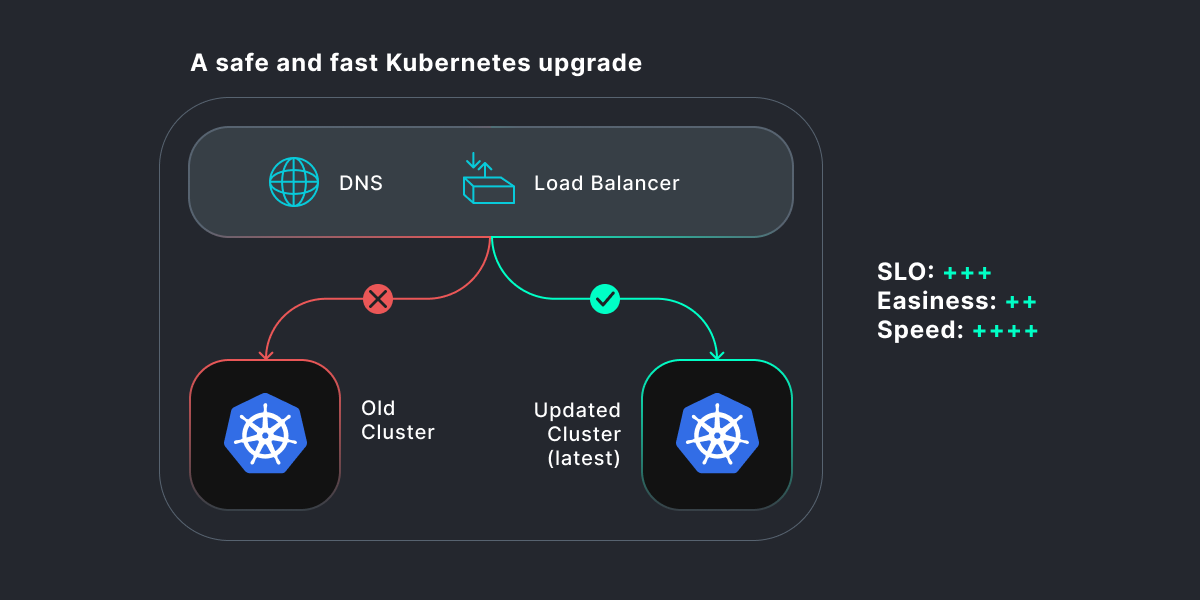
Safe and fast Kubernetes upgrade

This option is basically a blue-green upgrade to the latest cluster version. This method is particularly straightforward if your applications do not rely on persistent volumes (PVs). It is also considered one of the safest and fastest ways to upgrade your cluster.
The process involves creating a new cluster with the latest version of Kubernetes. Once the new cluster is created, you replicate your workloads, configurations, and dependencies, then gradually switch traffic from the old cluster to the new one.
An advantage of this approach is that you can easily roll back to the previous cluster if any issues arise during the upgrade process. By keeping the old cluster intact and operational, you have a fallback option in case of any unforeseen problems. The disadvantage is working on your own isolated branch(es) for a long time and performing a difficult merge in the end.
Conclusion
Given widespread adoption and vigorous community support, Kubernetes is likely to preserve its leadership in container orchestration for the foreseeable future. For individuals with Kubernetes skills, this means that their expertise will remain relevant and in-demand for a considerable time. Understanding how to upgrade and manage Kubernetes clusters is an essential part of maintaining Kubernetes-based infrastructures.


